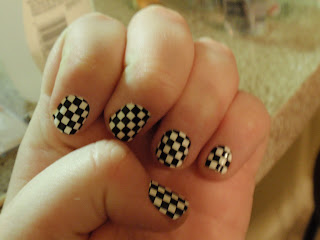
Alllllllrighty then. Man, I had a crazy week/weekend. Lots of getting to know coworkers and then number-crunching. Before I went out on Friday, I wanted to add a little bit of excitement to my outfit - in the form of checkered nails!
I used the Sally Hansen stick-ons, which I love. A lot of people seem a little intimidated by them, but they're surprisingly easy to use. And they're quick. You can just stick them on and go without having to worry about waiting for them to dry. Which I'm terrible at.
When you open up the package, you'll see two sets of stickers, a pseudo nail-file, a weirdo toothpick, and some instructions. I really suggest actually reading those before you start. First step is to remove any old nailpolish, push your cuticles back with the funky toothpick, and then rub the light pink end of the file over the surface of your nails. This will make them look a little sad, but it helps the stickers stay stuck.
Now you can stick your stickers on! It works best if you figure out which size you'll need for each finger ahead of time. You can actually use either end of the sticker. Look closely and you'll see that the weird square end can be removed, giving you more sizes to play with. Once you have the sticker on, rub the part touching your nail with the grey back of the file. This helps it stick. Then, pinch and pull the excess towards the center of your nail, stretching the part attached to you just a bit. Don't pull too hard! That'll cause your sticker to rip like crazy and look terribly stretched out. Take the dark pink end of the file and lightly rub it along the end of your nail, cutting the sticker along the way. Rub the grey side along the edge to get rid of any bumps.
Now your nail should look like this! If you have a little excess here and there, use the file and the tooth picky to get rid of it.
If you want you can add a clear topcoat, which will help it last a little longer (about 2 weeks) and look shinier. Tada! See, that wasn't so bad.


No comments:
Post a Comment